The Fort Knox of Outboard Motor Locks
- TylerBay Lock is a patented Outboard Motor lock, designed to prevent the theft of your outboard motor, this locking system can be installed in minutes. Making the theft of your outboard motor nearly impossible to steal.
Outboard motors are stolen every year from marinas, parking lots, and even your own driveway, many of them in broad daylight! When you’re spending thousands of dollars on your small outboard motor it only makes sense to protect it from theft. If you've ever had a motor stolen you're all too aware of the hassle and cost of replacement. The cost of the lock is only a fraction of the price of your insurance deductible alone, not to mention any revenue losses you may sustain if you have to cancel a boat load of clients because you're trolling motor disappeared overnight. Make the investment, and have the security of knowing when you get up to go fishing in the morning your trolling motor is going to be attached to your boat.
Tylerbay Lock Installation Video
Check out this great video
TylerBay Lock Installation Instructions
Step 1
Step 1
Step 1

Insert the carriage bolts from underside of base plate up through the holes in handles. Place the washer and nut on the carriage bolt and tighten finger tight…Once nuts have bottomed out back off a 1/4 turn, Note: On Honda motors the slots in the base plate may not align with the holes in the handles, not to worry the carriage bolts and nuts are not required for the lock to perform.
Step 2
Step 1
Step 1

Slide Lock housing over the base plate.
This can be done either direction allowing you to insert the locking mechanism from the top or underneath side.
Step 3
Step 3
Step 3

Place the key in the lock and retract the
deadbolt. Insert the locking mechanism into the lock assembly keeping the dead bolt pin pointing towards you. Turn lock key until the dead bolt is thrown & remove key.
Step 4
Step 3
Step 3

Firmly press the water tight cap with o ring into
place. This completes the installation of your TylerBay Lock™ assembly. (Remember to remove the cap and lubricate the lock every few months, if you’re constantly around salt water we recommend you lubricate more often)
Tips to Selecting the Correct Lock
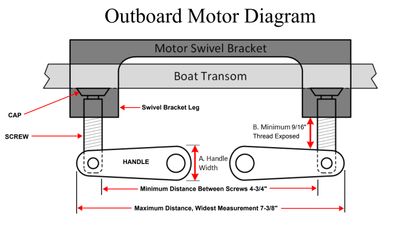
1. Measure width of handle on your outboard motor, See Fig A. in diagram below. Our narrow handle lock NH 750-8 TSP fits Suzuki, certain Tohatsu & Yamaha 8 to 20 Horsepower outboard motors with cap screw handles measuring up to 7/8” wide maximum. Our wide handle lock WH 875-8 TSP fits Honda, certain Tohatsu & Mercury 8 to 20 Horsepower outboard motors with handles measuring between 1” to 1-3/16” wide. When ordering a wide handle lock you must specify Honda or Mercury.
2. Lock Installation Video: https://youtu.be/lkpmpmGSuHo


The locking mechanism can be inserted into the lock housing from the top side or the underside, you can also see a spacer plate resting against the transom, this is the transom extension plate, it may be needed to get the proper spacing between the cap screw handles and the clamp leg.

At TylerBayLock, our mission is to provide the highest level of security for your outboard motors. We understand the frustration and financial burden that comes with motor theft, which is why we created a reliable locking system.
Contact Us
On Line Purchases Only
Email Mark Tyler at: mark.tyler81@gmail.com or text message 360-772-1133
This website uses cookies.
We use cookies to analyze website traffic and optimize your website experience. By accepting our use of cookies, your data will be aggregated with all other user data.